# Upgrading from version 2.x
DANGER
BACKUP! BACKUP! BACKUP!!!
(No, really, make a full backup of everything)
Always backup your existing website files and database before attempting an upgrade. Backing up your database can be done using your web host's database management tool which is often available through their control panel, 'phpMyAdmin' is typically available. Some hosts offer more advanced or alternative backup methods via their control panels, speak with your host if you have any questions about performing backups of your site or databases.
Important! If you are upgrading from a version of OR v2 prior to v2.1, make sure your existing listing fields setup includes a 'type' field (all lowercase) and that all of your listings have been edited and assigned to one of the types you have defined, such as commercial, residential, land, and etc. Failure to do this will result in the upgrade script being unable to convert your listings to use the new Property Class system which replaced property types after OR v2.1
Please note that templates and add-ons created for OR v2.x will not work or work completely with OR v3 unless or until they are modified. To prevent any unnecessary problems occurring during the upgrade process we suggest that all previous OR v2.x add-ons are removed before proceeding.
Obtaining the upgrade
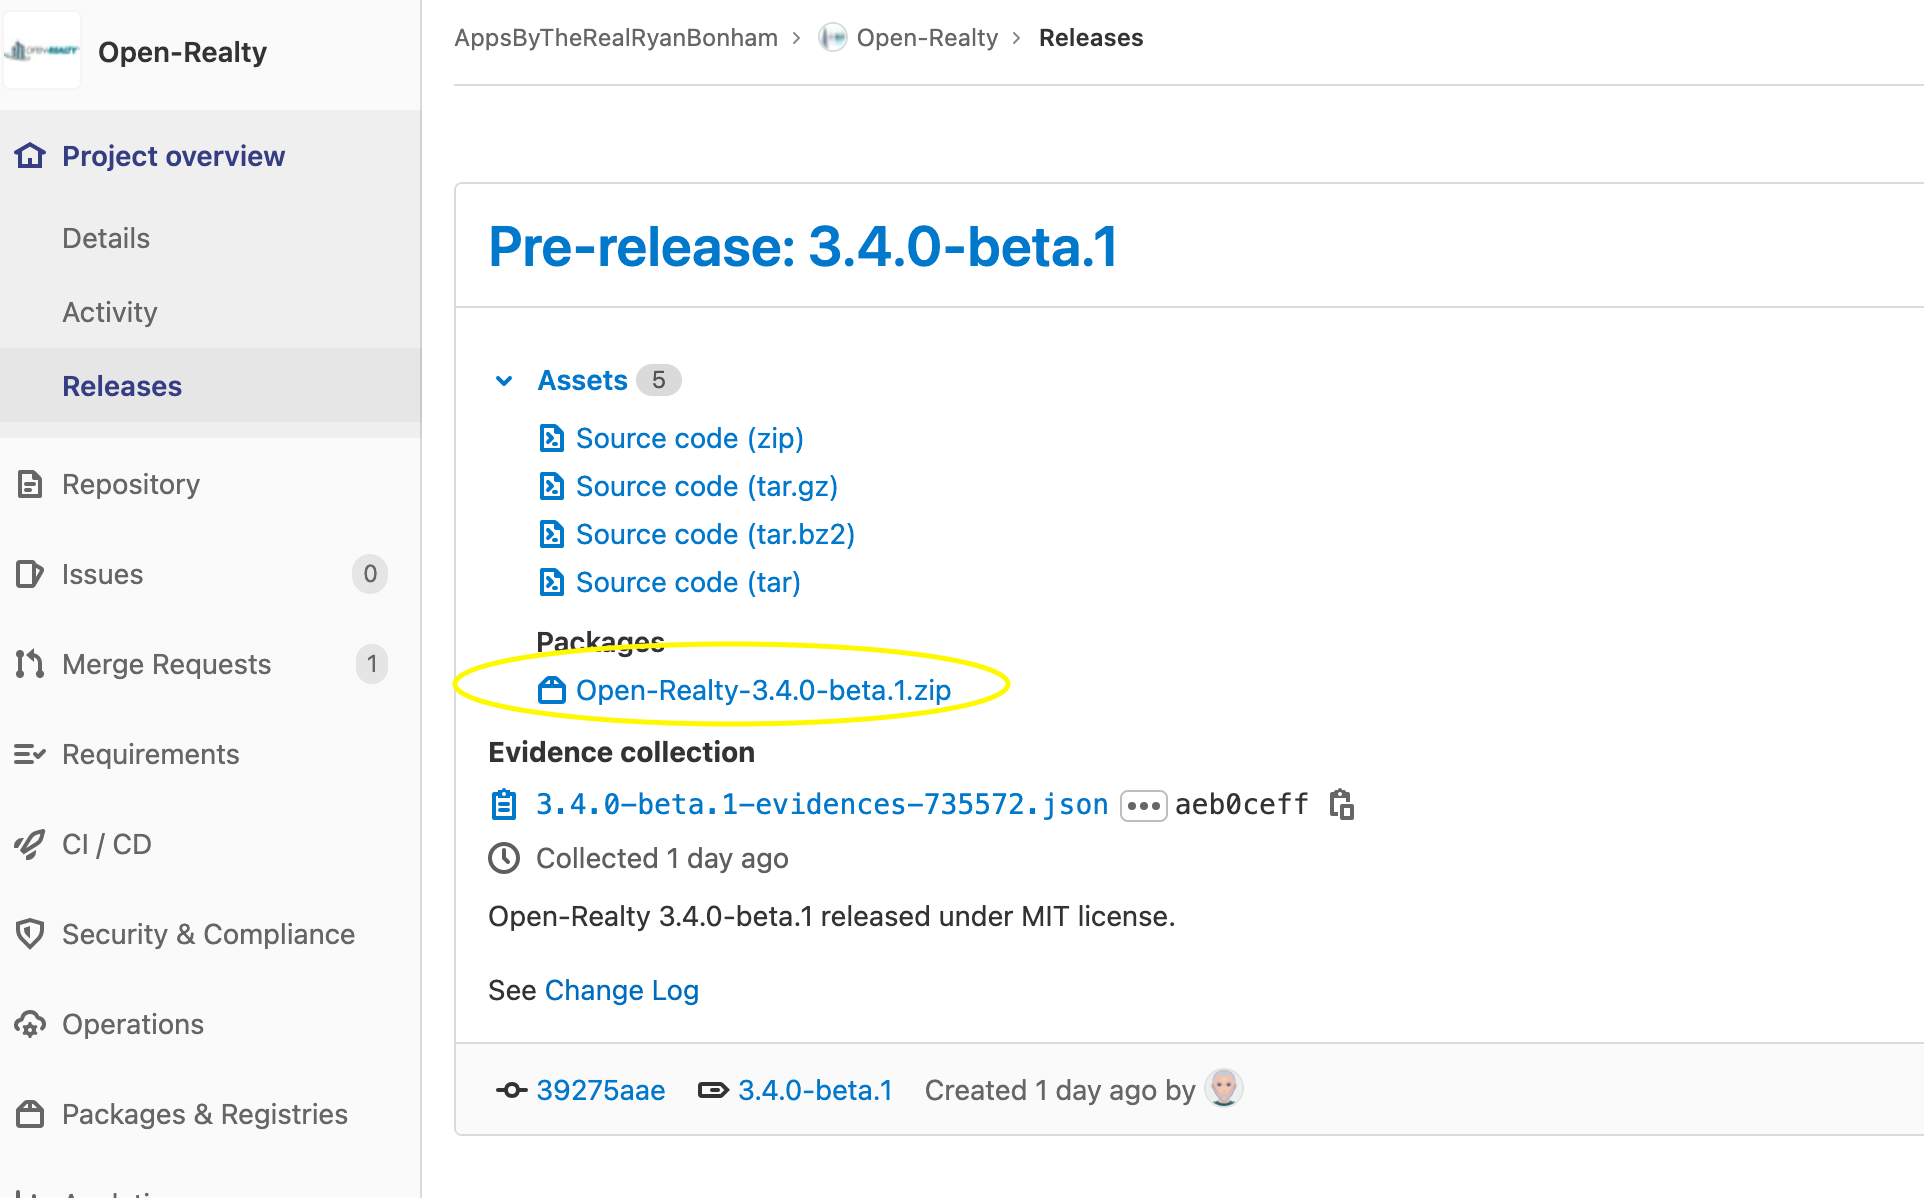
- Download the latest official Open-Realty release (opens new window).
TIP
Download the Package Zip file as shown in this screenshot, not the raw src zips..
Preparing for the upgrade
From the OR v2.x Site Configuration, make sure your Administration template is set to 'OR_small' and the Site Template is set to 'lazuli'.
Delete the OR v2.x /admin/ folder. This will be replaced by the upgrade.
Access your OR v2.x /template/ folder and rename or remove the following template folders if present:
- /template/lazuli
- /template/cms_integration
Access your OR v2.x. /addons/ folder and delete any sub-folders. OR v2.x add-ons are not compatible with OR v3 and should be removed prior to upgrading. You may restore any add-ons later after you can obtain upgraded versions that work with OR v3.
Extract and upload the upgrade
- Extract the OR v3 .ZIP file you downloaded to your local computer and upload the OR v3 program files to your web hosting account, overwriting your previous OR program files.
Running the installer
- Using your web browser, access the OR installer: http://www.yourdomain.com/INSTALLPATH/install/index.php, replacing INSTALLPATH with the sub-folder OR is installed in (if applicable).
TIP
Installer URL syntax:
http://www.yourdomain.com/INSTALLPATH/install/
Replace 'yourdomain.com' with your actual domain name and INSTALLPATH with the sub-folder name (if applicable) where OR was installed.
For example, if you installed OR to a hosting account that uses the domain name: 'myrealestatecompany.com' and placed the files in a sub-folder of the document root named "open-realty" you would use "open-realty" as the INSTALLPATH and navigate to:
http://www.myrealestatecompany.com/open-realty/install/index.php.
If you installed OR to the document root of your hosting account, and not a sub-folder, you would omit the INSTALLPATH entirely. This is the most common installation location.
http://www.myrealestatecompany.com/install/
- Read the license agreement and click the "Agree" button to continue.
- Select the default language for your site and click submit. NOTE:English is the only language file that is regularly maintained by the Development team. If you have difficulty installing due to blank pages in another language it is likely due to an incomplete or missing lang file for your selected language. To fix that you can open the /install/lang/en/ folder and replace the lang.inc.php file from your configured lang folder with the one from the 'en' folder.
- The next screen verifies the file permissions. If it finds any permission problems correct them and refresh the page. When all permissions are correct; Click "Click to Continue Installation".
- You now need to select the type of installation you are performing. You should be selecting "Upgrade from Open-Realty 2.x (Beta 1 or higher)
- Verify all of your database and configuration information is correct. This information is automatically populated from the existing common.php file. Click next.
- This step updates the common.php file, which stores the database configuration information for Open-Realty® to use. Click "Continue to setup the database."
- This step will create and populate the Open-Realty database tables.
- Click "Click here to configure your installation". This will take you to the OR administration area login page. Your username and password information will be unchanged from the prior version you had installed. Log in as the administrator: 'admin' or an account with admin privilege.
- You must delete the /install folder or rename /install/index.php before the public site will be accessible.
- Make sure you have any necessary CRON jobs setup as described in Automating Tasks Congratulations, your Open-Realty v3 database and core software upgrade is complete!
# Upgrading Open-Realty 2.x Templates For Open-Realty 3.x
You should start by making a copy of your custom v2.x template. In the steps below you will modify this template copy and not your original template files. This way you have the original files left to compare any other custom changes you may have made to sub templates.. Now that you have your new template copy, follow the steps below.
Copy all of the .html files from the lazuli template with the exception of main.html into your new template folder. This will ensure that all your sub template are updated to work with 3.x.
Open up the style_main.css file in lazuli template and copy all of the css starting with line 121 "/* Login and other Stadanrd Button CSS */ " to the end of the file. Paste this into your template's css file below any of your template specific CSS. You should replace any of the Open-Realty® 2.x CSS in the file that does not pertain to your specific template.
Edit your templates main.html file, and ensure it contains the following lines inside of the tags.
<title>{site_title}</title>
{load_meta_description}
{load_meta_keywords}
<meta http-equiv="content-type" content="text/html;charset={charset}" />
<meta http-equiv="X-UA-Compatible" content="IE=EmulateIE7" />
<meta name="robots" content="{meta_index},{meta_follow}" />
{meta_canonical_block}<link rel="canonical" href="{canonical_link}" />{/meta_canonical_block}
<meta name="Generator" content="Open-Realty" />
<link rel="shortcut icon" href="{template_url}/images/favicon.ico" />
{load_css_style_main}
<link rel="alternate" type="application/rss+xml" title="{company_name} - {lang_rss_lastmodified_link_title}" href="{rss_lastmodified}" />
<link rel="alternate" type="application/rss+xml" title="{company_name} - {lang_rss_featured_link_title}" href="{rss_featured}" />
<link rel="alternate" type="application/rss+xml" title="{company_name} - {lang_rss_blog_post_link_title}" href="{rss_blog_posts}" />
<link rel="alternate" type="application/rss+xml" title="{company_name} - {lang_rss_blog_comments_link_title}" href="{rss_blog_comments}" />
{load_js}
- Last, ensure that right before the ``tag in your main.html file you have this tag
{load_js_last}
That should upgrade your template to 3.x, you may now make any css adjustments, or sub template modification that you wish to make. I suggest if you modify your CSS, to make upgrading easier that you clearly mark the start and end of your custom CSS with comments, this way as update happen and there are css changes that you can quickly copy and paste your custom css into new files..