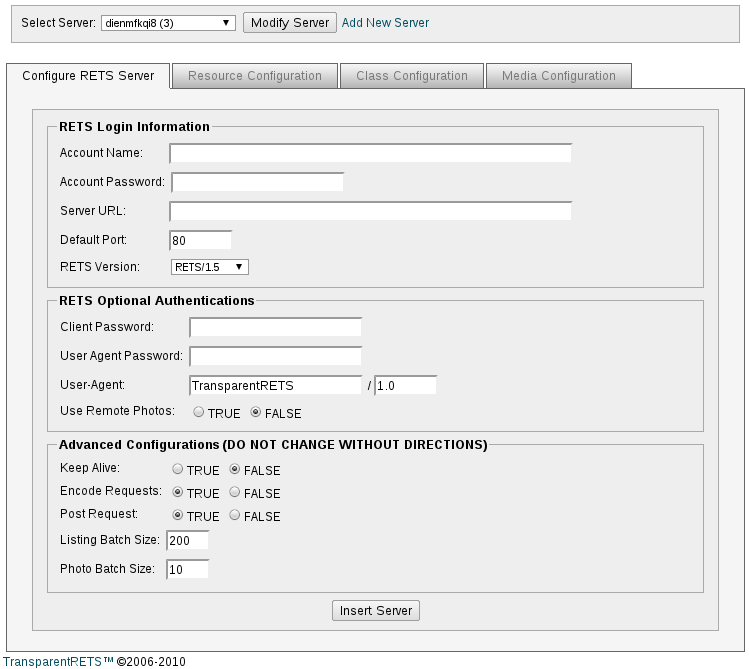
# Configure RETS server
The first thing you need to do in setting up TransparentRETS™ is to configure your connection to your MLS's RETS Server.
1. Start by clicking on
the  button
on your Open-Realty Admin screen.

2. Click on the "Add New Server" link in the top Server Selection Bar.
3. Now you need to enter your RETS Login information. This information is provided by your MLS.
A. Enter your RETS account/user name provided by your MLS.
B. Enter your RETS login password provided by your MLS.
C. Enter your RETS server's URL provided by your MLS.
E. Enter the port number for your RETS server. In most cases this will not be needed the port will be included in your URL and will be detected by our software.
F. Enter the RETS version number that your MLS RETS server is compliant with.
4. Set any optional Authentication methods used by your MLS's RETS Server.
A. Client Password - This is an optional secondary password used by some RETS 1.5 servers.
B. User Agent Password - This is an optional secondary password used by some RETS 1.7 servers it may also be called a UA Authorization Password by your MLS.
C. User-Agent - If your MLS filters based on User-Agent enter the user-agent they gave you here.
5. Set the "Use Remote Photos" option. Setting this to true will only import the hyperlink to the image into Open-Realty, and not the full image. Your RETS server must support pulling photos using the optional "location=1" flag. You will need to check with your MLS to see if they support this option.
6. Advanced Configuration Options You should only change the advanced settings if directed by Open-Realty Developers.
7. Click the "Save Server" button.
8. Great you are now ready to procced with your RETS Resource Configuration.
