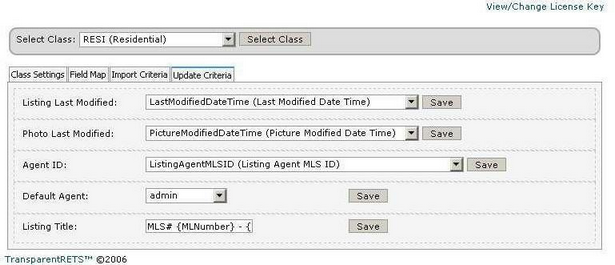
# Update Criteria Tab
This is where you identify to TransparentRETS which fields in the RETS feed are used in each property class for required functions.

None of these settings are optional!
Listing last Modified: From the pull-down selection locate the listing field that contains the last time the listing DATA was modified. Click save. This is a critical field, make sure you select the correct one.
Photo Last Modified: From the pull-down selection locate the listing field that contains the last time the listing PHOTOS were modified. Click save. This is a critical field, make sure you select the correct one. If no "last modified" or similar field is present for photos, leave the selection as-is: 'No photo Update field available'.
Agent ID: From the pull-down selection locate the listing field that contains the MLS's unique identifier or ID# for Agents. Click Save. This is a critical field for assigning listings to your installed Open-Realty Agents, make sure you select the correct one. This field must also be mapped via the Field Map tab.
Default Agent: Select 'admin' from the pull-down selection and click save.
Listing Title: For our quick setup you can enter just about anything and come back to fix it later if you wish. Otherwise, a good unique listing title can be assembled for each listing you import automatically using the MLS# and the various fields that makeup the full street address. Something like the following example is what we use, but your field names will almost certainly be different.
Residential MLS# {MLNumber} - {StreetNumber} {StreetDirection} {StreetName}, {City}, {State} {Zip}
You are now finally ready to move on to perform your first Residential class import
TIP
Both the last modified: fields and the Agent ID: field names used in the example image above are specific to the RETS feed we used to create this guide, your available field names will most certainly be different.
